Today’s second driver cuts across my lane. http://t.co/7sUCutO
Updates
1
Aug 11
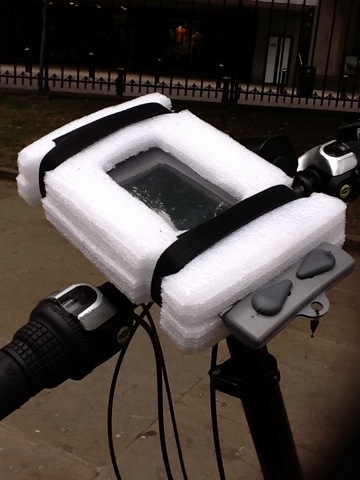
iPhone cycle mount mark one
Here is mark one of my iPhone mount. It comprises some closed cell foam from server packaging, some Velcro pop riveted to a small piece of hardboard, and an old light mount bolted to the hardboard. The foam is cutaway inside to provide a space in which the iPhone in an aquapac can sit snuggly. Being mark one, this isn’t elegant, but it is functional, and did excellent service on the way to work this morning.
19
Jul 11
Pictures from Segovia and #sssw11
Here is a selection of photos from Segovia. This evening trip was organised by the 8th European Summer School on Ontology Engineering and the Semantic Web. First we had a tour of Segovia, followed by Cochinillo (roast suckling pig) at Resturante José Maria.
[flickr-gallery mode=”photoset” photoset=”72157627100200713″]
17
Jul 11
Winning Video from #sssw11
One aspect of the mini-projects at #sssw11 was to create a one minute video that was both humorous and contained reference to some innovative semantic technologies.
Our Mini-Project team, Don’t Move the Plants was intrigued by the signage in the residencia, so took that as our inspiration. It is worth noting that all the text translation seen in the video is as translated by Word Lens, an iPhone app which translates words right before your eyes.
Don’t Move the Plants comprised myself, Esther Lozano, Andrea Nuzzolese, Ferdinand Dhombres and Luca Greco.
I’m at risk of over explaining the joke, so here is our winning entry.
28
Jun 11
Fix a single space in a URI
Looking for a regex to fix a file with a space appearing in random places in the URI:
sed -e 's/\(<[^ >]*\) \([^ ]*> [<.]\)/\1_\2/' < file.nt > newfile.nt
An improvement would be to change that to include more than one space… So here is my test command where I look for a token in the output to see what is matching:
sed -e 's/\(<[^ >]*\) \{1,\}\([^ ]\{0,\}> [<.]\)/\1FOUND\2/' < file.nt | grep FOUND
24
Jun 11
Running Jena Eyeball on Mac OSX
A HowTo for running Jena Eyeball on Mac OSX.
- Download the eyeball package somewhere convenient.
- Create the following script somewhere convenient, then add it to your PATH.
#!/bin/bash
# script to run eyeball on a file or files

FILES=$@
FILEBASE="/YOUR/PATH/TO/eyeball-2.3"
CLASSPATH="$FILEBASE/lib/antlr-2.7.5.jar:\
$FILEBASE/lib/arq-extra.jar:\
$FILEBASE/lib/arq.jar:\
$FILEBASE/lib/commons-logging-1.1.1.jar:\
$FILEBASE/lib/commons-logging.jar:\
$FILEBASE/lib/concurrent.jar:\
$FILEBASE/lib/eyeball.jar:\
$FILEBASE/lib/icu4j_3_4.jar:\
$FILEBASE/lib/iri.jar:\
$FILEBASE/lib/jazzy-core.jar:\
$FILEBASE/lib/jena.jar:\
$FILEBASE/lib/jenatest.jar:\
$FILEBASE/lib/json.jar:\
$FILEBASE/lib/junit4.jar:\
$FILEBASE/lib/log4j-1.2.12.jar:\
$FILEBASE/lib/slf4j-api-1.5.6.jar:\
$FILEBASE/lib/slf4j-log4j12-1.5.6.jar:\
$FILEBASE/lib/stax-api-1.0.jar:\
$FILEBASE/lib/wstx-asl-3.0.0.jar:\
$FILEBASE/lib/xercesImpl.jar:\
$FILEBASE/lib/xml-apis.jar:\
$FILEBASE/lib/xsdlib.jar:\
$FILEBASE/lib:\
$FILEBASE/mirror:\
$FILEBASE/etc"

for file in $FILES
do
echo "======================================="
echo "    Checking $file"
echo "======================================="
java -classpath "$CLASSPATH" jena.eyeball -check $file

done
- You may want to tell Jena what schemas you are using. I did this by downloading all the schema rdf or n3 files I could find to the {eyeball_install_dir}/mirror direectory, then adding the following to the end of the java command line:
-assume owl dc-all `ls $FILEBASE/mirror/*`
This means that we don’t get so many ‘predicate not declared’ messages when we will only ignore them.
Don’t you just love Java and its classpath loveliness… NOT.
9
May 11
Installing 4Store on MacOSX
Having got on fairly well with installing swiftOWLIM, I thought it would be a good idea to have a go with 4Store.
- Download the disk image.
- Open the disk image and copy the app to your Applications.
- Run the app.
- A terminal window will open which has the 4Store command-line tools in it’s path.
- Create a database (instructions): I went with the basic command.
4s-backend-setup mystorename
- Load some data (instructions): here I wanted to load multiples so used the command:
4s-import mystorename `ls /path/to/ntriples/*.nt`
Some few minutes later (really not very long at all), my 18 million triples were loaded at a rate of something like 55,000 triples per second!
- Set up a SPARQL endpoint (instructions). 4Store has an internal soft limit on SPARQL queries to protect you from expensive ?s ?p ?o queries and other expensive query types. This defaults to 1000, but I wanted to alter that so I could run some queries which I knew were going to be inefficient due to the structure of the data I am working with. As this is my dev machine, I decided to just turn the soft limit off for all SPARQL endpoints that I create. Therefore I created a config file in
/etc/4store.confsudo vi /etc/4store.conf [default] soft-limit = 0 #disable soft limit.Then started the SPARQL http server endpoint on my chosen port.
4s-httpd -p 8000 mystorename
- All done. and running expensive queries that return pretty fast.
This has to be the easiest setup of a triple store yet.
6
May 11
Installing SwiftOWLIM on MacOSX
I’m sure there are other guides out there, but his is how I did it, and works for me.
Install tomcat
Use macports to install tomcat6
sudo port install tomcat6
This puts tomcat in /opt/local/share/java/tomcat6/
The tomcatctl script can be used to start and stop tomcat.
sudo tomcatctl start
sudo tomcatctl stop
sudo tomcatctl restart
We’ll also be editing tomcatctl to add some specifics for our sesame install.
Install Sesame
- Download the sesame tar and unwrap it somewhere convenient.
- Drop the .war files from the war/ directory into the tomcat6/webapps/ directory.
- Restart tomcat
- go to http://localhost:8080/openrdf-sesame
- You’ll likely get an error beacuse sesame is tryin to write some directories and log files to a protected area of the system. Therefore you can do this:
cd ~
mkdir Aduna
chmod 777 Aduna
- Then add this Java opt to your tomcatctl script. You may also want to change the maximum memory tomcat can use.
JAVA_OPTS='-Dinfo.aduna.platform.appdata.basedir=/Users/myid/Aduna/'
JAVA_OPTS="$JAVA_OPTS -Xmx1024m"
Install SwiftOWLIM
- Download the SwiftOWLIM distribution.
- Follow the instructions in the SwiftOWLIM documentation for a step by step vanilla install.
(I also copyed {swiftowlim_dir}/lubm/ontology/owl.rdfs to /Users/myid/Aduna/ontology/ but not sure I needed to.)
All Done: hopefully…. now to load some data…
Load Data
Now, I’m sure there are better ways… but…
This script (run using sudo) finds all the files in a given directory that are .nt (ntriples) files.
#!/bin/bash
# script to load data to a local swiftowlim instance.

LOG=load_mydata_swiftowlim.log

for file in `find $1 -name "*.nt"`
do
    ( time  ./loadFileSwiftOwlim.sc $file ) 2>&1 | tee -a $LOG
done
Which calls this expect script to use the sesame console to load the files into the repository.
#!/usr/bin/expect
# script to load data to a local swiftowlim instance.

puts "\n#### Sending $argv"
spawn /opt/local/share/openrdf-sesame-2.3.3/bin/console.sh

expect "> "
send "connect http://localhost:8080/openrdf-sesame.\r"

expect "> "
send "open mystore.\r"

expect "mystore> "
send "load $argv.\r"

expect "mystore> "
puts "\nLoaded $argv"
5
Mar 11
Installing pho on ubuntu
Pho is a ruby gem for working with the Talis Platform written by a colleague at Talis, Leigh Dodds.
Having only just installed this on my home machine, I thought I would document how I did it ready for the next time. There is a good chance I did something wrong which meant that I had to install some extra dependencies for the talis_store script (which is what I wanted pho for), but I don’t know enough about ruby to say what.
$ sudo apt-get install ruby
$ sudo apt-get install rubygems
$ sudo apt-get install ruby1.8-dev
$ sudo gem install pho
Then I wanted to find the executable talis_store because it wasn’t in my path.
$ sudo find / -name talis_store
$ ln -s /var/lib/gems/1.8/bin/talis_store ~/bin/talis_store
Then when running talis_store I had to work through an additional few unmet dependancies.
$ sudo gem install rdf
$ sudo gem install rdf-json
$ sudo gem install rdf-raptor
All done 🙂